

| Home |
|
|||
| ||||
Customizing Star Wars Minis 11Snowtrooper on Blizzard Force Speeder Bike (Part 1) | ||||
|
Welcome to the eleventh in a series of articles about customizing Star Wars Miniatures. In this final two-part installment, we'll work on a more advanced project involving a vehicle and its rider. You should have experience customizing before attempting this project. The Battle of Hoth is one the greatest conflicts in the Star Wars universe. The struggling Rebel forces defended the Hoth base against the massive forces of the Empire. General Veers directed the Imperial troops of Blizzard Force from his personal AT-AT Blizzard 1. The AT-ATs and ground troops were led into battle by the AT-ST Blizzard Scout 1, but who scouted ahead and spearheaded the entire assault in front of all of Blizzard Force? None other than the brave Snowtrooper on the Blizzard Force Speeder Bike. To make this custom, you'll need two miniatures: a Scout Trooper on Speeder Bike (from the Rebel Storm set) and a Snowtrooper with E-Web Blaster (from the Champions of the Force set or the Battle of Hoth Scenario Pack). It is possible to make this custom using other figs, and at the end of the next article, I'll go over those options as well as other variations.
Because both figures have long pieces, they might be slightly bent. Use the hot water method (see article 4) to straighten them out before you begin cutting. They might become bent again while working, but it's better to start with pieces in the correct positions to ensure true and straight cuts. If the pieces become overly bent again while working, you might have to straighten them again before doing any major cutting or gluing. Having the pieces in the correct shape ensures that they fit correctly and hold together well.
Once the pieces are in the correct positions, you can start to separate them into the elements that you'll need. First, just like a Wookiee, pull off the arms of the Scout Trooper that are holding the speeder bike handles, and pull off the arms of the Snowtrooper that are holding the E-Web handles. In each case, pull the arms completely free of the shoulders. If the arms won't pull out easily, try wiggling them back and forth before trying again. If you still can't pull the arms off, cut them off in a straight line where the shoulders meet the body. When the arms are free, hold the speeder bike by its main body, and push the Scout Trooper backward until he separates from the seat. With his feet still attached to the foot pedals, slide him off the back of the bike so that he is completely free. Finally, cut the Snowtrooper free with clean, straight cuts where the bottom of his feet meet the base. 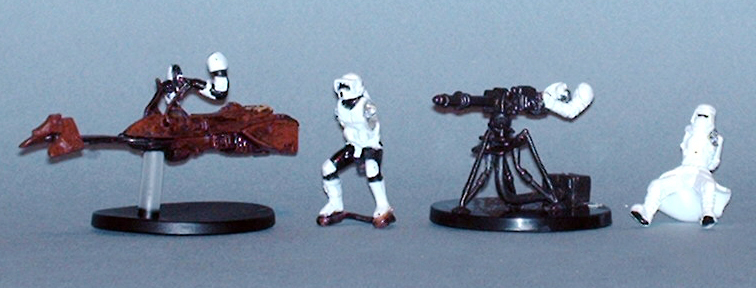 Next, trim the pieces so that they will all fit together. First, carefully cut the back half of the seat from the bike to create a flat, smooth surface. Place the Scout Trooper face down, and cut his feet from the foot pedals after noting how the pedals are attached to the feet. Then cut the posts that were holding the arms in place. Since this brave trooper will be scouting ahead of the other Imperial forces, we'll have to give him a fighting chance by incorporating the E-Web blaster onto his bike for extra fire power. Cut the main part of the blaster from the tripod, and then cut the E-Web barrel loose where the mount meets the computer fire control. Finally, cut the handles with the arms from the computer fire control, and then cut the posts from the shoulders. 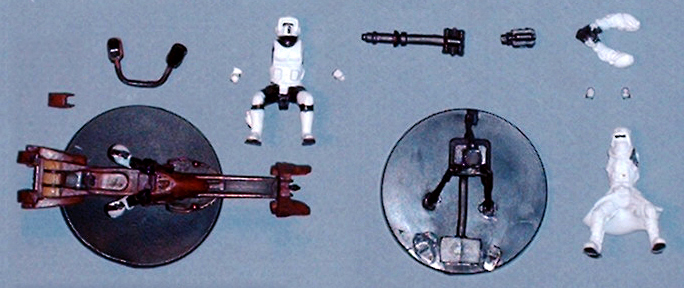 Don't throw away the posts that you just cut off. Instead, carefully glue the posts back into the corresponding slots on each trooper, and trim the posts flat as needed. (You won't need to trim the posts if you cut the arms off instead of pulling them off.) If you have difficulty holding the posts while gluing them back into place, carefully push them onto the very tip of your hobby knife, and use that to glue them into place.  Next, prepare all the pieces for pinning. (See articles 6 and 7 for details. If you don't use the pinning method, skip down to the next step.) You'll need to put pins in the shoulders, the bottom of the Snowtrooper, the mounting bracket of the E-Web barrel, and the computer fire control. Drill corresponding guide holes for the pins in these places: Be sure to hold the pinned pieces in place first to see where to make your guide holes before you actually drill any holes. 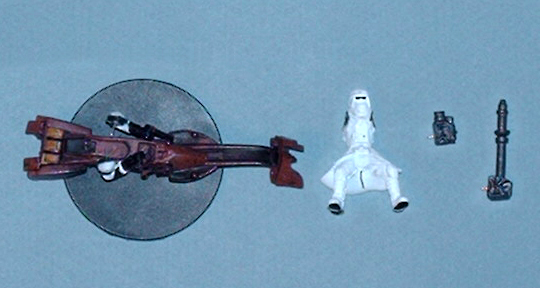 Next TimeIn the final article on customizing Star Wars Miniatures, we'll finish the Snowtrooper on Blizzard Force Speeder Bike and go over different variations that you can make. About the AuthorJack Irons is an artist and graphic designer. He has been fan of Star Wars since he was four, when his dad took his sister and him to a matinee on the second day of its release. He posts regularly on the Star Wars Miniatures Game boards under the name "ironlightsaber" and often works with other board members on projects such as the Lost Twenty fan set. Jack lives in the middle of the U.S. with his wife Ruth and their son. | ||||